
When Your Kitchen Sink Won’t Drain: What to Do Right Now
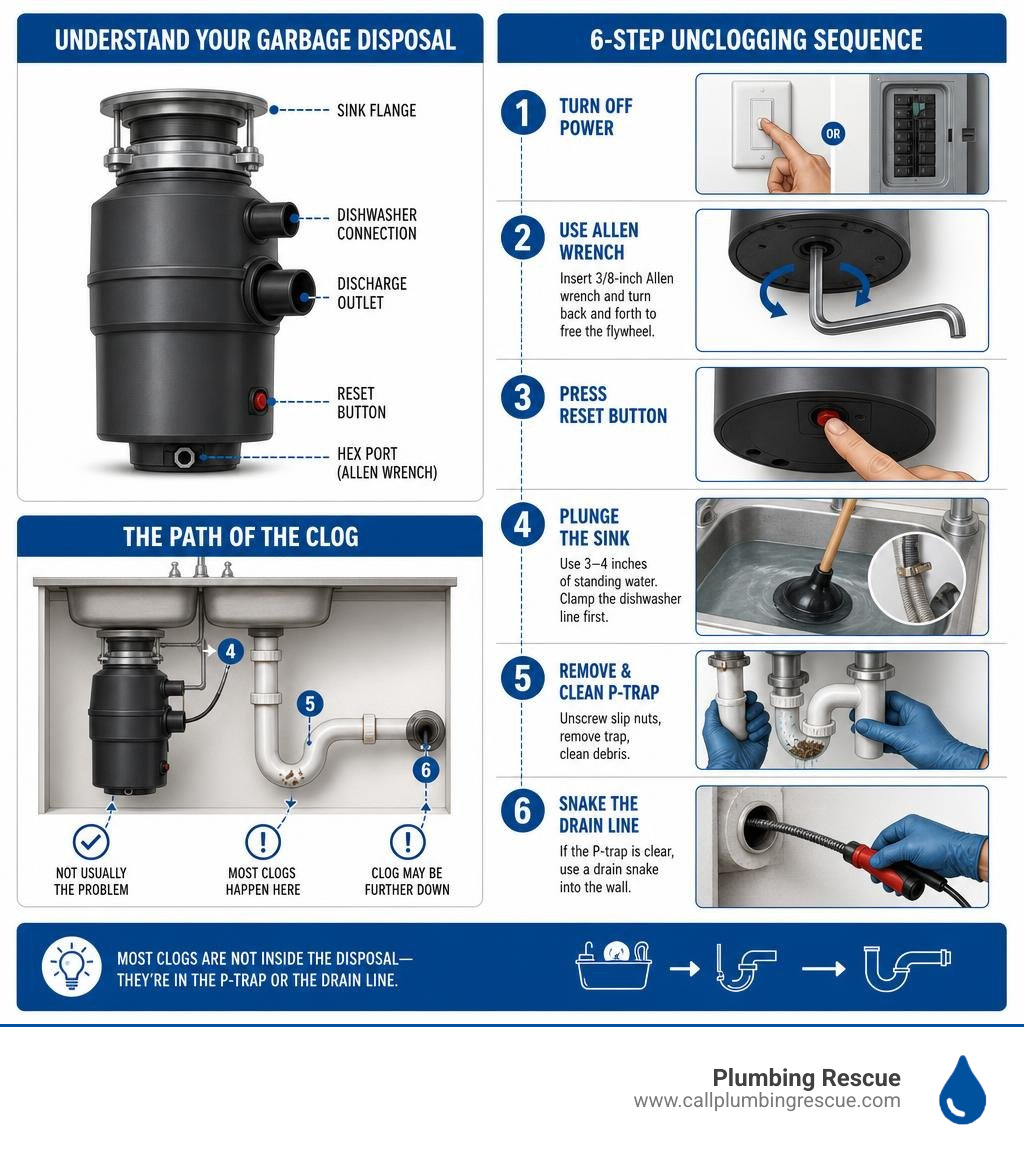
The best way to unclog a kitchen sink with a garbage disposal is to work through these steps in order:
- Turn off power to the disposal at the wall switch or breaker
- Use a 3/8-inch Allen wrench in the hex port under the unit to free the flywheel
- Press the reset button on the bottom of the disposal
- Plunge the sink with 3–4 inches of standing water (clamp the dishwasher line first)
- Remove and clean the P-trap if water still won’t drain
- Snake the drain line into the wall if the P-trap is clear
Most clogs are not inside the disposal itself — they’re in the P-trap or the drain line further down the pipe.
You flip the switch. Instead of the usual grind, you get a hum — or nothing at all. Water sits in the sink, going nowhere. It’s frustrating, and if you’ve got dishes piling up, it feels urgent.
The good news? Most kitchen sink clogs with a garbage disposal can be fixed without calling a plumber. The fixes are straightforward once you know where to look and what to do first.
I’m Ben Smith, a digital marketing consultant with over 25 years of experience helping home service businesses — including plumbing companies — communicate complex, practical solutions clearly to homeowners searching for the best way to unclog a kitchen sink with a garbage disposal. In that time, I’ve worked closely with plumbing professionals and have a deep understanding of what actually works when a disposal clogs.
Easy best way to unclog a kitchen sink with garbage disposal glossary:
Why Kitchen Sinks with Garbage Disposals Get Clogged
Before we roll up our sleeves and dive under the sink, we have to understand what we are actually fighting. Over 25 million U.S. households wrestle with a clogged disposal annually. When you look at the statistics, a staggering 72% of these clogs are caused by greasy food scraps and stringy, fibrous vegetables.
Garbage disposals are incredible convenience machines, but they aren’t industrial trash compactors. The impellers inside the unit don’t actually cut like sharp knives. Instead, they spin rapidly, mashing food particles against a stationary outer shredder plate. When we overload this system or feed it items it cannot handle, a backup is inevitable.
Several common culprits cause the vast majority of our kitchen sink headaches:
- Kitchen Grease, Fats, and Oils: When hot grease goes down the drain, it looks harmless. But as soon as it hits the cold pipes beneath your sink, it solidifies. It acts like glue, trapping other food debris and slowly narrowing the diameter of your pipes.
- Starchy Foods: Pasta, rice, oatmeal, and potato peels are the archnemeses of your drain line. When exposed to water, these starches expand and turn into a thick, sticky paste that easily seals off your plumbing.
- Fibrous Vegetables: Celery, corn husks, onion skins, and banana peels contain tough, stringy fibers. These fibers can wrap around the spinning impellers, physically jamming the disposal motor.
- Coffee Grounds and Eggshells: Coffee grounds do not wash away easily; instead, they settle in the P-trap, forming a dense, sludge-like barrier. Eggshells get ground into tiny, sand-like particles that combine with grease to build a concrete-like blockage.
To help you keep your drain running smoothly, we’ve put together this quick-reference guide on what is safe to put down your unit versus what should always go straight into the trash:
| ❌ NEVER Put Down the Disposal | Safe for the Disposal |
|---|---|
| Cooking grease, lard, and cooking oils | Small pieces of cooked meat |
| Pasta, white rice, and potato skins | Soft vegetable scraps (carrots, zucchini) |
| Celery, corn husks, and artichokes | Small fruit scraps (apples, berries) |
| Large bones, peach pits, and seafood shells | Ice cubes (great for scouring the chamber!) |
| Coffee grounds and whole eggshells | Cold running tap water |
When these off-limits items slip past the drain flange, you end up with a system that refuses to clear. If you want to dive deeper into the mechanics of why these units stall, read our guide on Why Your Garbage Disposal Is Refusing To Dispose.
The Best Way to Unclog a Kitchen Sink with Garbage Disposal
When your sink is backed up, the best way to unclog a kitchen sink with a garbage disposal is to approach the problem systematically. We want to rule out a mechanical jam within the unit itself before we move on to clearing the plumbing lines further down.
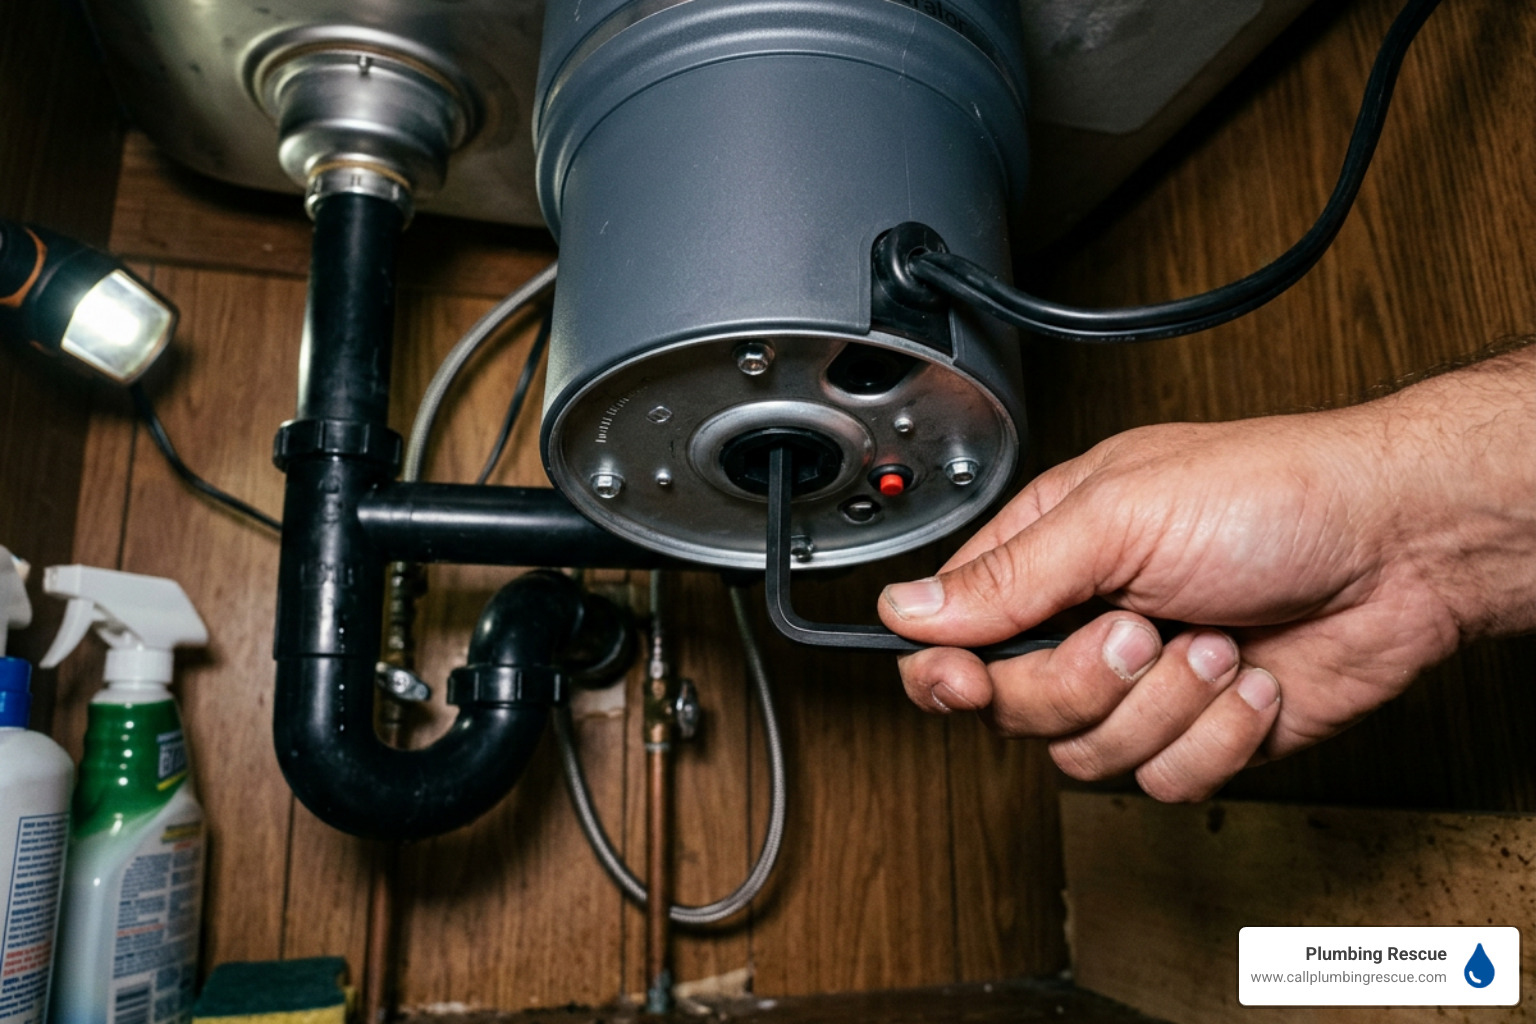
If you turn on your disposal switch and hear a low, dull hum but the blades aren’t spinning, you are dealing with a mechanical jam. The motor is receiving electricity, but a physical object is blocking the impellers from rotating. If you hear absolutely nothing when you flip the switch, the unit’s internal thermal overload breaker has likely tripped to protect the motor from burning out.
By utilizing a combination of mechanical adjustments from beneath the sink and targeted plunges from above, you can successfully resolve the vast majority of these issues. For a broader look at clearing these blockages without professional intervention, check out this step-by-step guide on How to Clear a Clogged Garbage Disposal Without Calling a Plumber.
Safety First: Preparing the Best Way to Unclog a Kitchen Sink with Garbage Disposal
Before we touch any tools, we must emphasize safety. A garbage disposal is a powerful electrical appliance connected directly to your plumbing system.
- Cut the Power: Never rely solely on the wall switch. Unplug the disposal unit from the electrical outlet beneath your sink. If your disposal is hardwired directly into the wall, locate your home’s electrical service panel (breaker box) and switch off the circuit breaker dedicated to the kitchen disposal.
- Keep Your Hands Out: Never, under any circumstances, insert your bare hands or fingers down into the disposal drain. Even with the power completely disconnected, the metal components can have sharp edges, and releasing a jammed flywheel can cause the impellers to suddenly spring back, causing severe injury.
- Gather Your Safety Gear: Grab a reliable flashlight, a pair of long needle-nose pliers or kitchen tongs, and safety glasses. We will use the flashlight to inspect the grinding chamber from above and the pliers to safely extract any wedged debris.
Step 1: Freeing the Flywheel with an Allen Wrench
Did you know that almost all major garbage disposal brands feature a manual override socket on the very bottom of the unit? This design allows you to manually rotate the motor shaft to break free any stubborn jams. This simple mechanical trick boasts an impressive 85% revival rate for simple jams!
Here is how to do it:
- Locate the Socket: Crawl under your kitchen sink with your flashlight. Look at the absolute center of the bottom of your garbage disposal. You will find a small, recessed hexagonal hole.
- Insert the Allen Wrench: Insert a 3/8-inch hex key (often called an Allen wrench or a disposal wrench) directly into this socket. Tip: Many manufacturers tape a wrench to the side of the unit during installation, or you can find one in a standard household toolset.
- Rock the Wrench: Firmly grasp the wrench and rotate it back and forth. If the flywheel is jammed, you will feel initial resistance. Use short, forceful jiggles to break the jam. Rotate the wrench clockwise and counterclockwise until you can spin it 360 degrees freely in both directions.
- Clear the Chamber: Go back above the sink. Use your flashlight to peer down into the drain. If the manual rotation dislodged the culprit (such as a stray bone, fruit pit, or a dropped utensil), use your long pliers or tongs to lift it out.
- Reset the Motor: Head back under the sink. Locate the small, square red button on the bottom or lower side of the disposal. This is the thermal reset button. If the motor overheated while jammed, this button will have popped out. Push it firmly back in until you hear it click.
- Test Your Work: Plug the unit back in (or turn the breaker back on). Run a strong stream of cold tap water down the drain, and flip the wall switch. The disposal should whir back to life smoothly.
For more brand-specific mechanical overviews, you can refer to How to Unclog a Garbage Disposal – The Home Depot.
Step 2: Plunging the Sink Correctly
If your disposal spins freely and runs without humming, but the water in your sink basin still refuses to drain, the clog is located further down the plumbing line. It is time to use a kitchen sink plunger.
Plunging a sink with a garbage disposal requires a specific technique to avoid pushing dirty water back into other appliances.
- Prep the Dishwasher Line: If you have a dishwasher, its drain hose connects directly to your garbage disposal. Before you start plunging, you must clamp this rubber line shut. If you don’t, the pressure from your plunging will force dirty, clogged water straight backward into your dishwasher tub. Use a strong pinch clamp or hose clamp to seal the rubber line under the sink.
- Seal the Adjacent Drain: If you have a double-basin sink, the two drains share a connection under the counter. To build up the necessary pressure to dislodge a clog, you must seal the non-clogged side. Have an assistant hold a rubber sink stopper or a thick, wet rag firmly over the other drain opening to block any air or water from escaping.
- Set the Plunger: Choose a standard flat-bottomed cup plunger (not a toilet plunger with an extended flange). Place the plunger cup directly over the clogged drain opening.
- Add Water: Fill the sink basin with about 3 to 4 inches of standing water. This water level ensures the rubber cup of the plunger is fully submerged, creating an airtight, hydraulic seal.
- Plunge Vigorously: Push down gently at first to force the air out of the plunger cup. Then, execute 10 to 15 rapid, powerful vertical plunges. Maintain a firm seal against the bottom of the sink. The push-and-pull motion of the water is what physically breaks apart and dislodges the organic blockage.
- Flush the System: Pull the plunger away. If the water rushes down the drain, you have successfully cleared the line! Remove your dishwasher clamp, run hot water for several minutes to flush the remaining debris, and check out our guide on Smart Solutions For Every Blocked Drainage System to keep your lines clear.
Advanced DIY Methods: P-Traps and Drain Snakes
If plunging fails to budge the standing water, the blockage is likely a deep organic mass located in the curved P-trap directly beneath the sink, or further down in the branch drain where the pipe enters the wall.
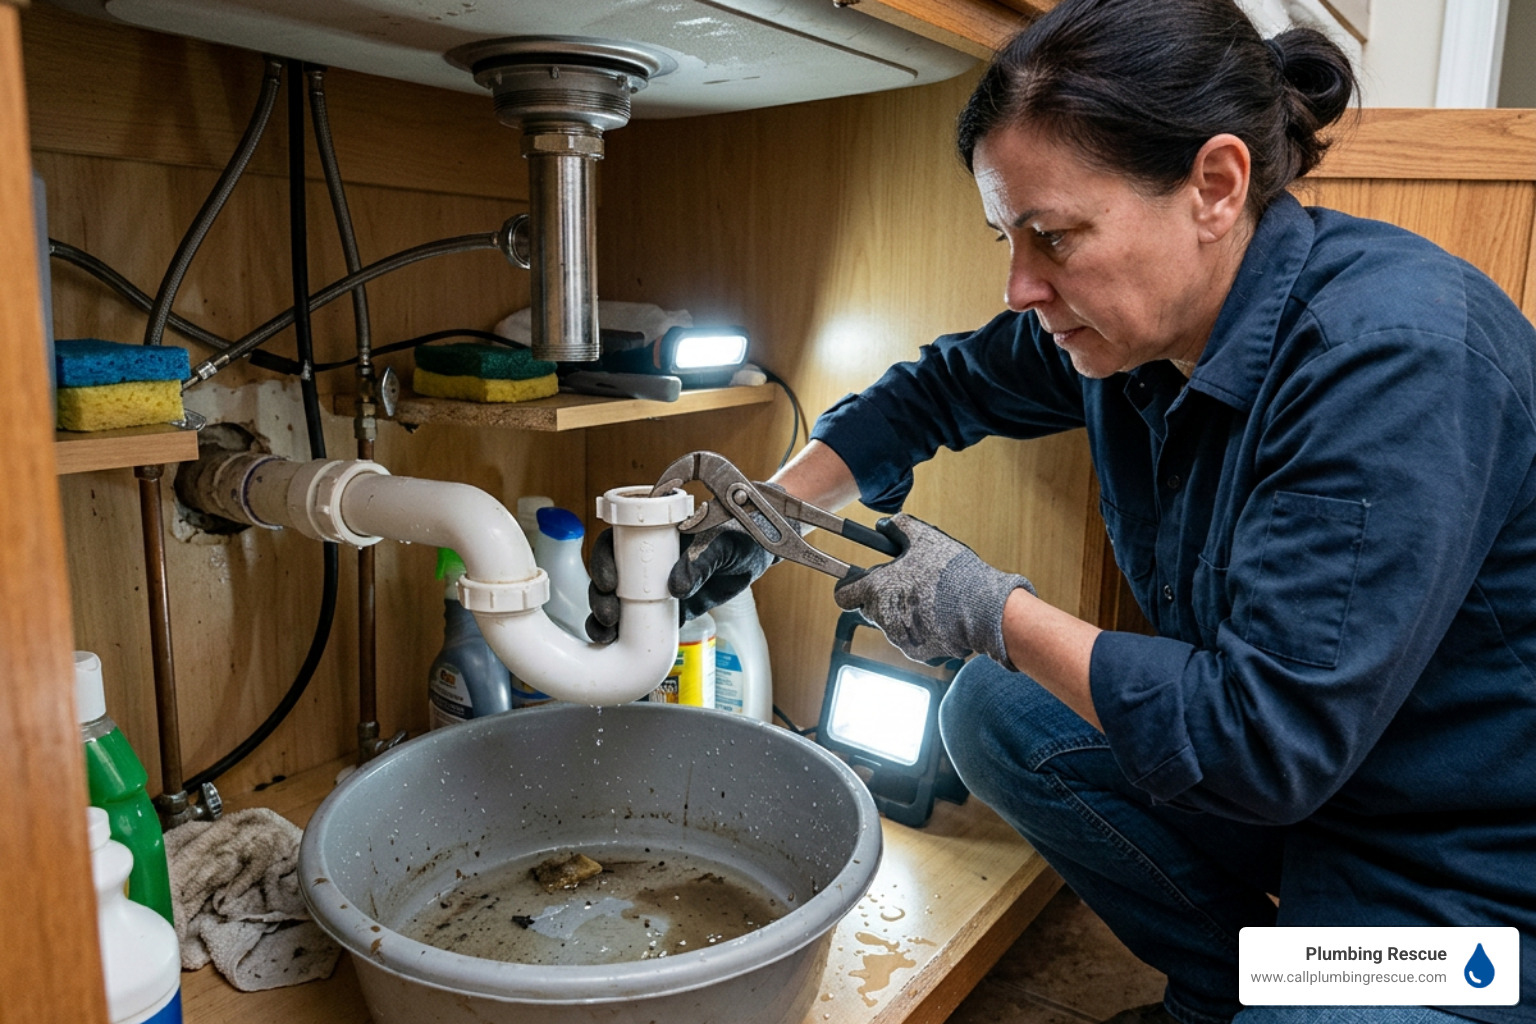
Do not panic. Cleaning the P-trap or running a hand-cranked plumbing snake are highly effective DIY skills that can save you an expensive service call.
How to Safely Remove and Clean the P-Trap
The P-trap is the curved, U-shaped section of pipe located directly beneath your sink drains. It serves a critical safety purpose: it holds a small amount of standing water that acts as a physical seal, blocking toxic sewer gases and foul odors from entering your home. Because of its sharp bend, it is also the single most common location for heavy food waste and grease to settle and form a dense block.
- Prepare for Water: Clear out all cleaning supplies from beneath your sink. Place a wide plastic bucket or shallow tub directly underneath the curved P-trap to catch the standing water and slimy debris that will escape when you open the pipes.
- Loosen the Slip Nuts: Standard residential P-traps are secured by threaded plastic slip nuts. Hand-tighten or use a pair of channel-lock pliers to gently loosen the slip nuts at both ends of the U-shaped bend. Note: Turn the nuts counterclockwise to unscrew them. If you have plastic pipes, be gentle to avoid cracking the threads.
- Remove the Trap: Carefully pull the U-shaped pipe segment straight down. Empty the dirty water and accumulated sludge directly into your bucket.
- Clean and Inspect: Take the removed pipe segment to another sink (or use an outdoor garden hose) and thoroughly scrub the interior. Use an old toothbrush or a flexible bottle brush to scrape away grease, soap scum, and food buildup. Ensure the interior walls of the pipe are completely clean and smooth.
- Check the Surrounding Pipes: Peer into the straight tailpiece descending from your sink drain, as well as the horizontal pipe leading into the wall. If you see grease or food debris hanging out there, scrape it out into your bucket.
- Reinstall the Trap: Slide the cleaned P-trap back into position. Hand-tighten the slip nuts firmly. Tip: Do not over-tighten plastic threads, as this can warp the rubber slip washers and cause persistent leaks. A firm hand-tightening plus a quarter-turn with pliers is usually perfect. Run some water to test for leaks.
For additional visual instructions on handling trap maintenance, read How to Unclog a Garbage Disposal: A DIY Guide – affresh® appliance care.
Using a Drain Snake or Auger on a Disposal-Equipped Sink
If you removed the P-trap, cleaned it thoroughly, put it back together, and the sink still backs up immediately, the clog is located deeper in the branch line where the pipe enters the wall and connects to the main stack. To reach this deep blockage, you will need a basic hand-cranked drum auger (often called a plumbing snake).
- Gain Direct Access: With your bucket still under the sink, remove the P-trap once again. This gives you direct access to the horizontal drain pipe that enters the wall, bypassing the garbage disposal entirely.
- Feed the Snake: Loosen the lock screw on your drum auger. Manually pull the steel cable out of the drum and feed the tip directly into the wall pipe. Keep pushing the cable in until you feel it hit physical resistance. This is either a sharp bend in the pipe or the clog itself.
- Crank and Rotate: Tighten the lock screw on the drum. Grasp the handle of the auger and crank it clockwise while applying gentle forward pressure. Rotating the cable allows the corkscrew tip to chew through grease, catch hair, or hook onto solid food masses.
- Retrieve the Debris: If the cable suddenly moves forward easily, you have broken through the barrier. Loosen the lock screw and slowly retrieve the cable back into the drum. Keep a rag handy to wipe down the slimy cable as it emerges. You will likely pull out a mass of congealed grease and old food.
- Reassemble and Flush: Reinstall your P-trap and tighten the slip nuts. Run a steady stream of warm water down the drain for several minutes to flush any loosened particles down the main sewer line.
How to Prevent Future Kitchen Sink Clogs
Once you have successfully cleared your sink, the last thing you want is to deal with another backup next month. Preventing clogs is incredibly simple and takes less than a minute of daily habit adjustments.
- The Cold Water Rule: Always run a strong, steady stream of cold water before you turn on your disposal, during the entire grinding process, and for at least 20 seconds after you turn the unit off. Cold water is vital because it keeps grease and fats solid, allowing the impellers to grind them into tiny particles that wash away easily. Hot water melts grease, causing it to coat your pipes further down the line where it eventually cools and creates a stubborn blockage.
- Feed It Slowly: Never dump a large plate of food scraps down the drain all at once. Feed items into the disposal in small, gradual batches. This gives the motor and impellers time to grind and flush the waste efficiently without overloading.
- Avoid the Off-Limits Items: Keep a small mesh strainer over your sink drain when the disposal is not in use to catch stray food particles, pasta, and coffee grounds so they can be easily tossed into your trash can.
To master kitchen plumbing maintenance, read through Your 24/7 Kitchen Plumbing Service Survival Guide.
Maintenance Tips and the Best Way to Unclog a Kitchen Sink with Garbage Disposal Prevention
In addition to proper daily use, performing a quick weekly or monthly maintenance routine can prevent up to 75% of garbage disposal clogs from ever forming.
- The Ice and Salt Cleanse: Once a week, fill your disposal chamber to the top with ice cubes, then pour in a half-cup of coarse rock salt or kosher salt. Run cold water and turn on the disposal until all the ice is ground up. The hard ice cubes and abrasive salt act as a physical scour, scraping away congealed grease, soap scum, and organic buildup from the spinning impellers and the inner chamber walls.
- Citrus Deodorizer: After running your ice and salt cleanse, toss a few fresh lemon, lime, or orange peels into the disposal and grind them up with cold water. The natural citrus oils break down lingering grease films and leave your kitchen smelling incredibly fresh.
- Utilize Enzymatic Cleaners: For deep organic maintenance, use a monthly enzymatic drain cleaner. These non-corrosive, natural cleaners contain live bacteria and enzymes that eat away at organic waste, grease, and hair lining your pipes without damaging your plumbing.
- Say No to Chemical Drain Cleaners: Never pour commercial chemical drain cleaners (like Drano or Liquid-Plumr) down a garbage disposal. These harsh, caustic chemicals generate intense heat and use aggressive acids that can corrode the delicate metal components of your disposal, melt plastic fittings, ruin rubber seals, and cause structural leaks. Furthermore, if the chemical fails to clear the clog, you are left with a sink basin full of highly toxic, splashing acid water that makes mechanical repairs incredibly dangerous for you or a professional plumber.
Frequently Asked Questions about Clogged Disposals
Dealing with a stubborn disposal can throw a wrench in your day. Here are quick, professional answers to the most common questions we receive from homeowners.
Why is my garbage disposal humming but not spinning?
A humming sound indicates that your disposal motor is receiving electrical power, but the inner flywheel and impellers are physically jammed by a foreign object or a dense mass of food waste. To protect the motor from burning out, the unit’s internal circuit breaker will typically trip within a minute of humming, shutting the power off completely.
To fix this, turn off the wall switch, unplug the unit, insert a 3/8-inch Allen wrench into the bottom socket, and rock it back and forth to break the physical jam. Once the flywheel spins freely, press the red reset button on the bottom of the unit and test it with cold running water.
Can I use boiling water to clear a disposal clog?
While boiling water is a popular internet home remedy for clearing minor bathroom grease clogs, we do not recommend using it in kitchen sinks equipped with garbage disposals.
First, modern kitchens utilize PVC (plastic) drain pipes and rubber gaskets under the sink. Boiling water can soften, warp, or melt these plastic pipes and damage the watertight seals, leading to major leaks. Second, pouring hot water down a grease clog simply melts the fat, pushing it further down your plumbing system where it cools, solidifies, and creates a much deeper, more complex blockage that is harder to reach. Always stick to cold water for daily disposal operations.
Is it safe to use baking soda and vinegar in a garbage disposal?
Yes, it is perfectly safe to use baking soda and vinegar in a garbage disposal, but it is important to understand its limitations.
While the foaming reaction looks impressive—resembling a childhood science fair volcano—baking soda (a base) and vinegar (an acid) actually neutralize each other rapidly. They do not possess the chemical strength to eat through solid food blockages or heavy grease dams. However, this natural combination is fantastic for minor deodorizing, breaking up light soap scum, and keeping your grinding chamber smelling fresh. Simply pour a half-cup of baking soda down the drain, follow with a cup of white vinegar, let it fizz for 15 minutes, and flush with warm tap water.
Conclusion
Taking care of your kitchen plumbing doesn’t have to be a stressful chore. By understanding what causes these blockages, utilizing the manual override socket, and plunging with the correct technique, you can easily tackle the best way to unclog a kitchen sink with a garbage disposal right from the comfort of your home.
However, some plumbing issues are simply too stubborn for DIY methods. If you have tried the Allen wrench, plunged the sink, cleaned the P-trap, and your water still refuses to budge, you may be dealing with a deep sewer line blockage or a worn-out disposal motor that has reached the end of its 8-to-12-year lifespan.
When DIY attempts aren’t enough, don’t risk damaging your pipes or your disposal unit. If you live in Austin, TX, Denver, CO, Indianapolis, IN, or Phoenix, AZ, we are here to help. At Plumbing Rescue, we offer rapid, 24/7 emergency plumbing services to get your kitchen back in working order day or night. Read our guide on Don’t Let A Clog Ruin Your Day Hiring Local Pros to see how we can help, or schedule professional service with Plumbing Rescue today to get a certified technician to your door fast!
Dealing With This Yourself? Talk to a Licensed Plumber.
Skip the guesswork — get a straight answer from a local pro. Available 24/7, no forms, no waiting.
Call Now: (888) 686-0698