

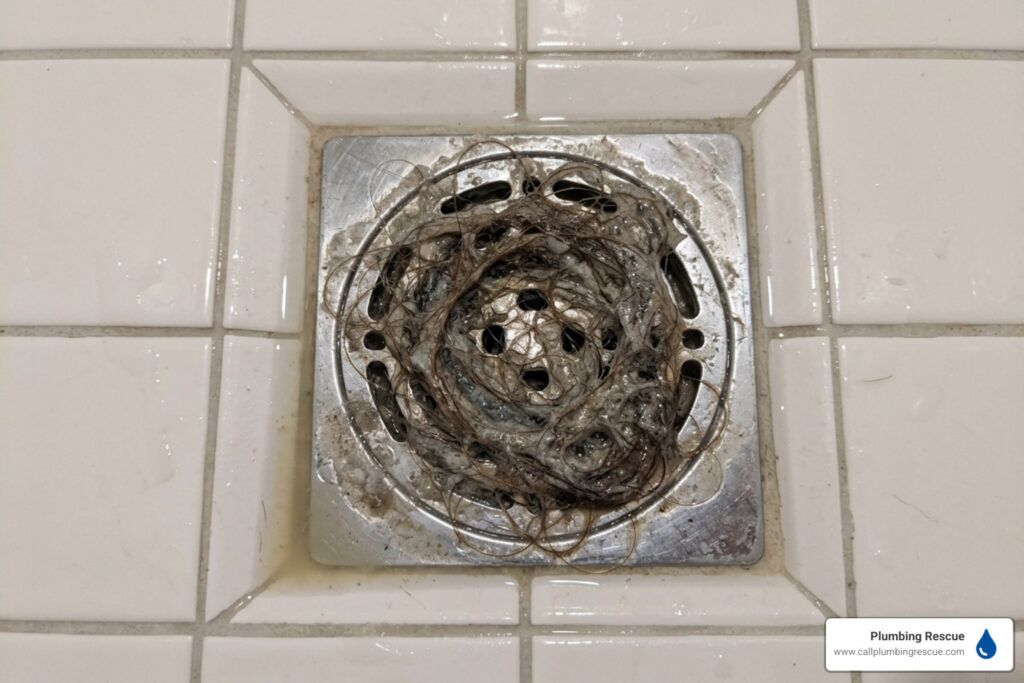
Common Causes of Bathroom Floor Drain Flooding
When you step out of the shower only to find yourself ankle-deep in standing water, identifying the underlying cause is the first step toward a lasting solution. Bathroom floor drains can overflow for several distinct reasons, ranging from simple surface blockages to complex structural pipe failures.
The most frequent culprit for an isolated shower or floor drain failure is a buildup of organic material. Hair strands bind with soap scum, body oils, and minerals present in hard water—an issue we see constantly across households in Phoenix, AZ, and Austin, TX. Over time, this mixture solidifies inside the top throat of the drain or within the P-trap, creating a dense plug that restricts water flow.

Shared Drain Clogs and Main Line Blockages
In many homes, individual bathroom fixtures—such as your bathtub, shower, bathroom sink, and floor waste—connect to a single shared branch line before tying into the home’s main waste line. If a blockage forms downstream in this shared branch pipe, draining a full bathtub will force excess water back up through the lowest available opening, which is almost always your shower or floor drain.
When the blockage is located deeper in the primary sewer line, the risk of serious water damage increases dramatically. Main sewer lines can become choked by deep tree root intrusions, shifting soil (frequent during freeze-thaw cycles in Denver, CO, or heavy rains in Indianapolis, IN), or collapsed aging pipes. Because the basement or ground-floor bathroom drain sits at the lowest elevation in your plumbing infrastructure, wastewater escaping a main line block will consistently flood out of this point first.
Damaged Gaskets and Detached PVC Drains
Not all bathroom drain floods are caused by internal blockages. Secondary flooding occurs beneath or around the shower pan when mechanical seals fail. Rubber gaskets inside compression-style shower drains degrade over time—typically after 8 to 10 years of exposure to hot water and household cleaners. When these seals crack or loosen, water seeps into the subfloor structure rather than flowing smoothly down the waste pipe.
Thermal expansion and contraction from repeated exposure to hot water can also weaken solvent-welded PVC connections, leading to a detached drain pipe beneath the shower pan. In aggressive cases, aggressive plunging on a stubborn surface clog can exert enough hydraulic force to dislodge an internal rubber gasket. To diagnose and address structural gasket issues without unnecessary teardowns, review our DIY guide to fix a leaking shower drain.
Emergency Steps When Your Bathroom Drain Overflows

When water spreads across your bathroom tiles, acting rapidly is critical. Taking immediate steps reduces structural damage and protects subflooring from long-term rot. If you are dealing with a sudden plumbing crisis, reference our complete Emergency Water Leak Guide for Homeowners to keep your family safe.
Immediate Action Plan to Stop Water Damage
- Cut Off the Water Source: Instantly shut off the shower or sink faucets. If water continues rising from the floor drain without any bathroom fixtures running, shut down your home’s main water supply valve.
- Eliminate Electrical Risk: If standing water approaches floor-level wall outlets, baseboard heaters, or electrical appliances, switch off electrical power to the bathroom directly at your breaker panel. Never step into standing water to reach a breaker box.
- Extract Standing Water: Use a wet/dry shop vacuum, heavy mops, and thick bath towels to soak up pooled floor water. Discharging water quickly is paramount; structural water damage can display visible effects within just 1 hour, while destructive mold spores can begin colonizing damp drywall, skirting boards, and subfloors within 24 to 48 hours.
- Disinfect and Ventilate: Wipe down all affected hard surfaces with a diluted disinfectant solution to kill bacteria. Set up high-velocity floor fans, run dehumidifiers, and open windows to promote maximum airflow throughout the room.
DIY Bathroom Flood Drain Fix Methods for Minor Clogs
If your flood is caused by a localized surface clog in the P-trap, you can perform an effective bathroom flood drain fix using standard home tools:
- Seal the Overflow: If clearing a combination tub and shower drain, seal the overflow plate tightly with duct tape or a damp rag. Creating an airtight seal prevents plunging pressure from escaping into the room.
- Plunge the Drain: Place a rubber cup plunger directly over the floor or shower drain opening. Ensure the cup is submerged under an inch of water to form a tight seal. Apply firm, rhythmically forceful downward and upward thrusts for 30 to 45 seconds to dislodge trapped hair masses.
- Apply Natural Cleaning Agents: Avoid harsh chemical drain cleaners, which generate intense heat that damages rubber gaskets and corrodes metallic fixtures. Instead, pour 1/2 cup of baking soda down the drain opening, followed immediately by 1 cup of white vinegar. Cover the drain with a rag for 15 minutes as the foaming action breaks down soap scum, then flush with a kettle of hot (not boiling) water.
- Use a Manual Hand Snake: Remove the top drain cover plate and gently feed a 15-to-25-foot manual drain auger into the pipe. When you meet resistance, rotate the crank handle clockwise to entangle the debris, then pull the snake back slowly to extract the blockage. For additional techniques on clearing stubborn blockages safely, check out our guide on Bathroom Drain Clog Fixes That Actually Work.
How to Execute a Permanent Bathroom Flood Drain Fix

Executing a lasting bathroom flood drain fix requires matching the repair strategy to the precise failure mode inside your plumbing system. While simple localized clogs can be resolved with minimal out-of-pocket expense, structural drain frame repairs demand high-grade materials and proper techniques.
| Repair Approach | Typical Parts & Labor Cost | Average Time Required | Expected Repair Lifespan |
|---|---|---|---|
| DIY Surface Clog Removal / Gasket Swap | $15 – $40 | 1 – 3 Hours | 8 – 15 Years |
| Professional Localized Drain Snaking | $150 – $300 | 1 – 2 Hours | 8 – 15 Years |
| Professional Main Sewer Hydro-Jetting | $300 – $600 | 2 – 4 Hours | Multi-Year Clear |
| Full Sub-Slab Shower Drain Demolition Repair | $1,500 – $4,000 | 1 – 3 Days | 15+ Years |
Reconnecting Detached PVC and Replacing Failed Seals
When a plastic shower drain detaches from the waste line under your subfloor, you don’t always need to tear down the ceiling below to perform a fix. Modern plumbing advancements allow top-down repair methods:
- Unscrew and remove the upper drain grate using a screwdriver or needle-nosed pliers.
- Cut away the upper damaged portion of the detached vertical PVC pipe using an internal PVC pipe cutter attached to a standard cordless drill. This creates a clean horizontal cut 2 to 3 inches below the shower pan.
- Clean the inside of the cut pipe thoroughly with fine sandpaper, wipe away plastic debris, and clean the rim using purple PVC primer.
- Apply heavy-body PVC solvent cement to both the pipe throat and the tailpiece of a specialized mechanical repair flange (such as a WingTite flange).
- Insert the repair flange top-down into the drain opening. Tighten the mechanical top screws, which expands locking wings underneath the subfloor while compressing a heavy-duty internal rubber O-ring against the PVC pipe wall.
- Seal the top rim beneath the strainer with a continuous 3/8-inch bead of 100% waterproof silicone sealant. Allow the assembly to cure for 24 hours before running water. For step-by-step guidance on structural pipe connections, see this guide to repair detached PVC shower drains.
No-Demo Basement Shower Drain Repair Solutions
Basement shower drains are embedded within concrete floor slabs, making traditional replacement invasive and expensive. When sub-slab drainage hardware leaks or fails, top-down mechanical repair techniques eliminate the need for concrete jackhammering:
- Perform a Static Plug Test: Insert an inflatable mechanical test plug inside the basement drain pipe beneath the shower base. Fill the pan with 2 inches of water and mark the level. If the level drops over 30 minutes without water appearing on the bathroom floor, the sub-slab drain body or gasket is damaged.
- Extract the Degraded Rubber Gasket: Use a pick or spring hook to pull out the dried, cracked compression seal located between the outer drain casing and inner waste pipe.
- Install an Internal Compression Flange: Clean the annular space with a small wire brush. Lubricate a new friction-fit rubber gasket with silicone grease, slide it over the pipe throat, and thread down an internal compression locking ring using specialized locknut pliers.
- Reseal the Strainer Rim: Clean the outer drain interface with denatured alcohol. Apply a flexible 100% silicone bead under the strainer housing to handle subtle foundation shifts typical in slab-on-grade homes. Read our complete no-demo basement shower drain repair guide for deeper technical specifications.
Preventive Maintenance to Avoid Bathroom Drain Overflows

Taking consistent preventative action is far more cost-effective than managing an emergency water flood cleanup. Incorporating simple maintenance routines into your home care schedule keeps your waste lines flowing freely year-round.
Step-by-Step Bathroom Flood Drain Fix and Maintenance Routine
- Install Hair Catchers: Cover all shower and bathroom floor drain openings with fine stainless steel or silicone strainers to trap hair and debris before it enters the P-trap. Clean these strainers after every shower.
- Maintain Unused Floor Drains: Floor drains located in basements or utility bathrooms feature a U-shaped P-trap designed to hold standing water. This water acts as a physical barrier preventing toxic sewer gas from entering your living space. If a drain goes unused, this water evaporates. Pour 1 gallon of water down infrequently used floor drains monthly, followed by 2 tablespoons of food-grade mineral oil to form a floating seal that slows evaporation.
- Perform Monthly Hot Water Flushes: Once a month, unscrew floor drain covers, scrub away soap scum from the grate using a stiff brush and mild soap, and pour 5 gallons of hot tap water down the line to flush away residual buildup.
- Inspect Rubber Seals Periodically: Every six months, visually examine the perimeter seal around your shower drain flange. If you notice cracking sealant or loose hardware, perform a quick paper towel leak test under access points. For step-by-step procedures on inspecting hardware longevity, refer to this step-by-step shower drain leak repair guide.
When to Call a Professional Plumber
While surface hair clogs can be handled with a plunger or hand snake, complex drainage emergencies require commercial tools and professional diagnostic expertise. Contact our team at Plumbing Rescue immediately if you experience any of the following warning signs:
- Multiple Fixture Backups: Water backing up into your shower when you flush the toilet or run the washing machine indicates a downstream main line blockage.
- Persistent Gurgling Sounds: Bubbling noises originating from your bathroom floor drain or toilet point to severe line pressure imbalances caused by trapped air behind a deep clog or blocked roof vent stack.
- Unexplained Sewage Odors: Strong, persistent rotten-egg odors emerging from floor drains suggest dried P-traps, cracked underground sewer lines, or venting failures.
- Recurring Clogs: If a floor drain backs up repeatedly within weeks of being cleared, tree root intrusion or pipe sagging is likely present.
Our licensed technicians utilize state-of-the-art diagnostic video cameras to inspect deep subterranean pipes without invasive digging, alongside high-pressure hydro-jetting equipment that scours line interiors back to original factory capacity. When minor drainage issues turn into an urgent overflow, depend on our 24/7 service by accessing our 24 Hour Drain Cleaning solutions.
Frequently Asked Questions About Bathroom Flood Drain Repairs
What are the main signs that a blocked main sewer line is flooding my bathroom?
A main sewer line blockage displays several distinct warning signs. Because the main line collects waste from your entire home, a deep obstruction causes water to back up at the lowest drain point—typically a basement or ground-floor bathroom floor drain or shower pan.
Key indicators include:
- Water bubbling up into the shower base when you flush an adjacent toilet.
- Gurgling or glug-glug sounds coming from floor drains when sinks or laundry appliances drain.
- Persistent sewer gas odors lingering in the room.
- Multi-fixture drainage failure affecting toilets, tubs, and sinks simultaneously across the house.
If you suspect a main sewer line block, halt all home water usage immediately and request professional emergency plumbing support.
How can I repair a leaking basement shower drain without breaking concrete?
You can repair a basement shower drain without breaking concrete by utilizing specialized top-down internal repair hardware. First, perform a static plug test using an expandable rubber test plug to confirm the leak is isolated to the drain neck assembly rather than an underground main line break.
Next, use an internal PVC pipe cutter attached to an electric drill to trim the damaged drain body from inside the drain throat, working entirely from above inside the shower pan.
Finally, install a specialized expanding repair flange (such as a WingTite unit) or a top-access rubber friction compression gasket. These components lock securely against the interior pipe wall and sub-floor pan using mechanical tensioning screws, creating a watertight seal without requiring heavy jackhammering or slab demolition.
How do I fix a detached PVC shower drain that leaks under the floor?
Fixing a detached PVC shower drain under the floor without opening downstairs ceiling drywall requires a mechanical top-down replacement approach:
- Remove the protective drain grate and inspect the drain throat with a bright flashlight to identify the detached or broken PVC joint.
- Cut away damaged top pipe sections inside the drain assembly using an internal drill-mounted PVC cutter.
- Clean all plastic shavings out of the waste line using a shop vacuum to prevent secondary clogs downstream.
- Prep the pipe throat with purple PVC primer and heavy-body PVC solvent cement.
- Lower an internal mechanical repair flange into the drain throat, pushing it firmly into the primed PVC pipe.
- Tighten the top-mounted mechanical screws on the flange assembly. This expands structural locking wings beneath the subfloor while compressing an internal rubber sealing ring against the pipe.
- Seal the top joint perimeter with 100% waterproof silicone sealant and allow it to cure for 24 hours before conducting a water flow test.
Conclusion
A flooded bathroom floor is one of the most stressful emergencies a homeowner can face, but knowing how to execute a systematic bathroom flood drain fix puts you back in control. By acting quickly—shutting off water supplies, protecting electrical systems, extracting standing water, and diagnosing whether the issue is a local hair clog, a failed compression seal, or a main line blockage—you protect your property from structural damage and mold growth.
Whether you need immediate advice, specialized DIY repair guidance, or round-the-clock professional plumbing intervention in Austin, Denver, Indianapolis, or Phoenix, our team is ready to help 24/7. Don’t let a minor drainage failure turn into an expensive home restoration project; contact our experts at Plumbing Rescue today to get your drains flowing cleanly and safely again.
Dealing With This Yourself? Talk to a Licensed Plumber.
Skip the guesswork — get a straight answer from a local pro. Available 24/7, no forms, no waiting.
Call Now: (888) 686-0698
