
How to Fix a Water Heater Leak Without Calling a Plumber
Stop Water Heater Leaks Before They Cause More Damage
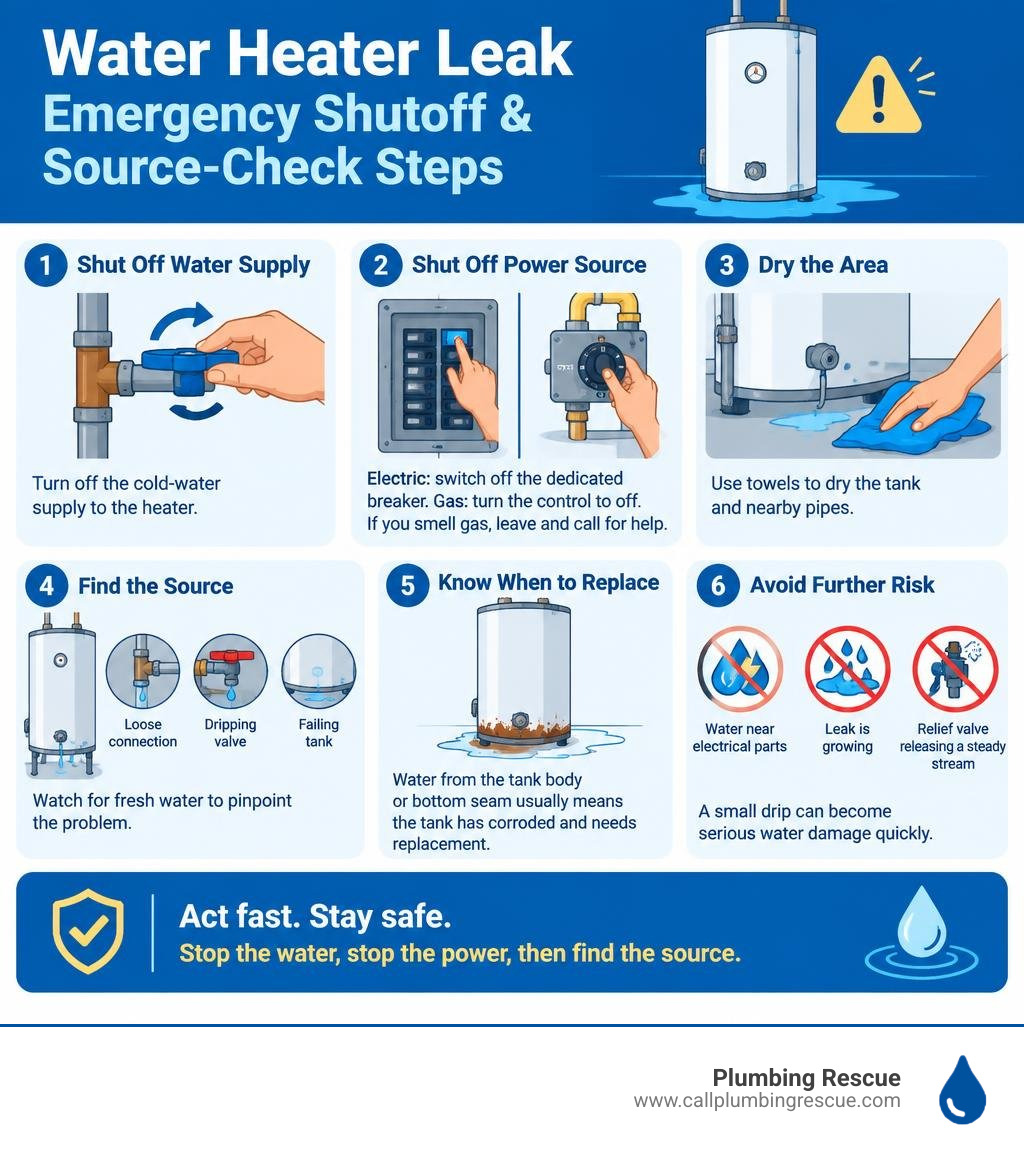
If you find water around your heater, turn off the cold-water supply and shut off the heater’s power source first. Switch off the dedicated breaker for an electric model. For a gas model, turn the control to off; if you smell gas, leave the area and contact emergency help or your gas utility.
Then dry the tank and nearby pipes with towels. Watch for fresh water to pinpoint whether the problem is a loose connection, a dripping valve, or a failing tank. Small leaks at fittings or the drain valve may be manageable DIY repairs. Water coming from the tank body or bottom seam usually means the tank has corroded and needs replacement.
Do not keep using a leaking heater while water is near electrical parts, the leak is growing, or the temperature-and-pressure relief valve is releasing a steady stream. A small drip can become serious water damage quickly.
I am Ben Smith, a digital marketing strategist with 25+ years of experience helping service businesses communicate clear, useful guidance during urgent home-service problems, including water heater leaks. This guide will help you take the safe first steps, identify what you can fix, and recognize when a DIY repair should stop.
Immediate Emergency Steps When Water Heater Leaks Occur
Discovering a puddle beneath your water heater is enough to make any homeowner’s heart skip a beat. Whether you are dealing with a gentle drip or a miniature lake spreading across your utility room floor, acting swiftly prevents minor plumbing headaches from turning into catastrophic structural rot.
Before grabbing a wrench or searching for spare parts, you must neutralize the immediate hazards. Water and energy sources never mix well, and a pressurized tank can release between 40 to 80 gallons of scalding water across your floorboards in minutes.
Cut the Power or Gas Supply Immediately:
- For Electric Units: Head straight to your main electrical panel and flip the dedicated double-pole circuit breaker to “OFF.” Never touch the heater’s metal jacket or stand in pooling water while interacting with the electrical panel.
- For Gas Units: Locate the thermostat control dial on the front of the tank and turn it to “OFF” or “PILOT.” If you need to shut down the gas entirely, turn the inline shut-off valve on the incoming gas line so the handle is perpendicular to the pipe. Reviewing safe procedures for shutting down your water heater in an emergency will keep your household safe during sudden system failures.
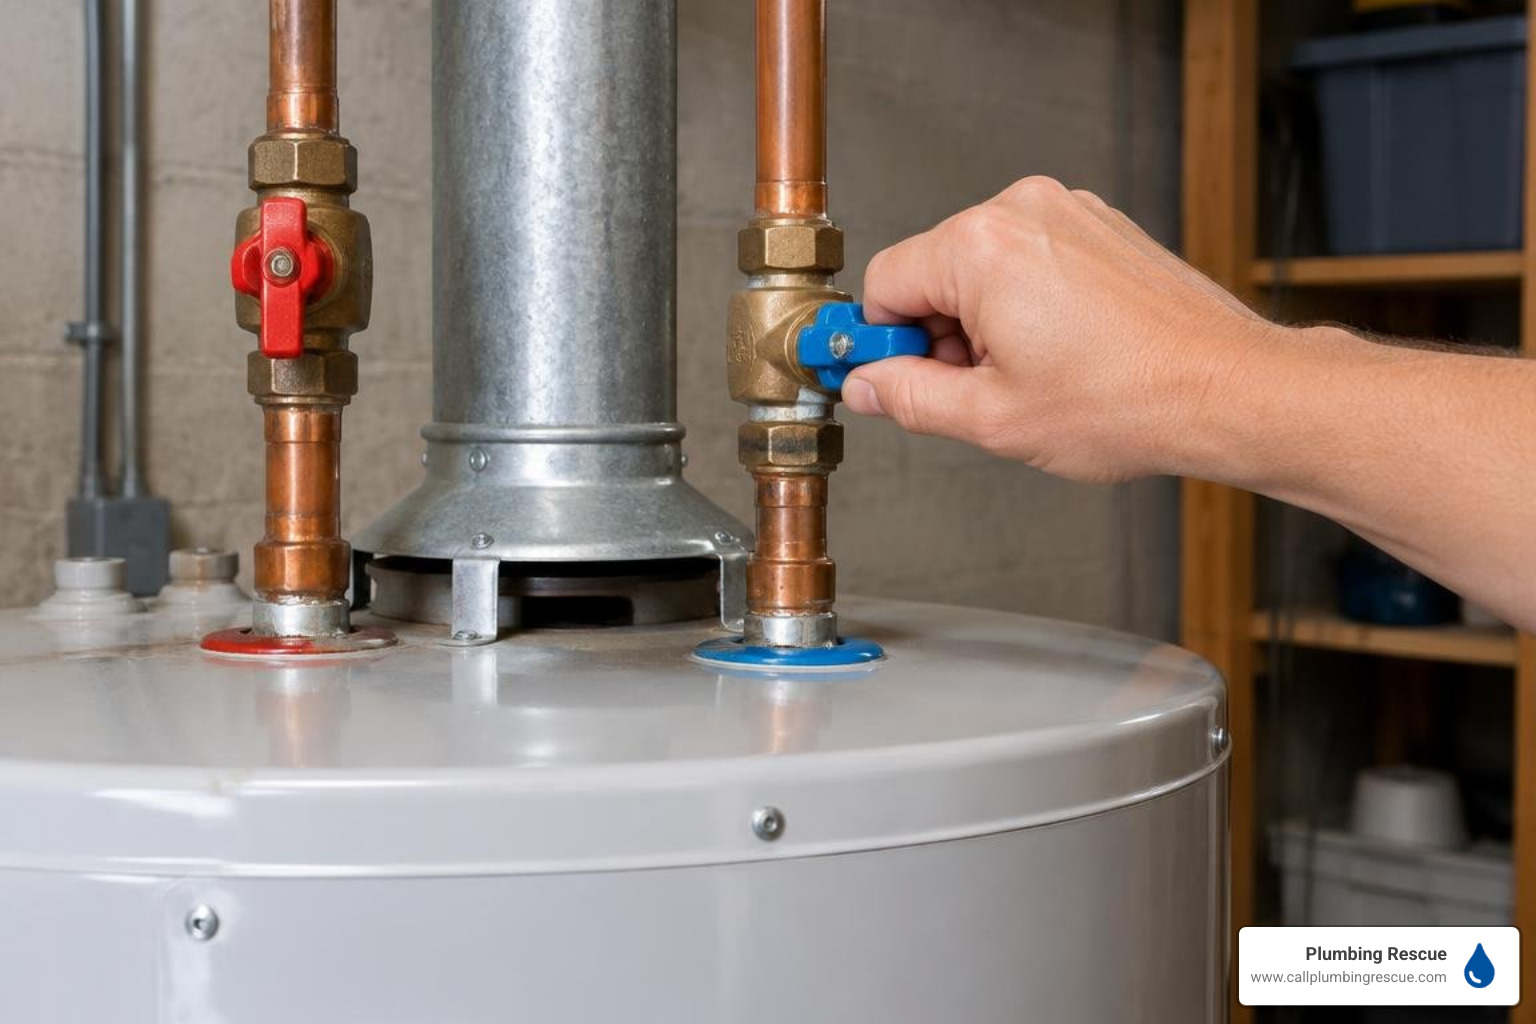
Shut Off the Cold Water Supply: Look directly above the unit for the cold water supply pipe. You will find either a gate valve (a round wheel) or a ball valve (a straight lever handle). Turn the wheel clockwise until it stops, or pull the lever a quarter-turn so it sits perpendicular to the water pipe. If this valve is stuck, heavily corroded, or spinning freely without closing, locate your home’s main water shutoff valve and shut down water to the entire house.
Contain the Standing Water: Use old towels, a mop, or a wet/dry shop vacuum to clear the standing water off the floor. Standing water can cause mold spores to propagate within 24 to 48 hours, threatening drywall, baseboards, and subflooring.
Document the Damage: Before wiping everything completely dry, pull out your smartphone and take crisp, well-lit photos and videos of the puddle, the water marks, and the heater itself. Should you need to file an insurance claim for damaged flooring or finished basements, clear documentation serves as invaluable proof for your adjuster.

Diagnosing the Source: Real Leak vs. Condensation
Once the power is disconnected and the incoming water is secured, you can safely play detective. Not every wet spot under a tank signals that your plumbing is doomed; occasionally, what looks like a disaster is simply normal physics in action.
Distinguishing Condensation From Active Water Heater Leaks
During cooler seasons or right after heavy hot-water usage, your water heater fills with cold ground water. When warm, humid ambient air hits the cold steel surface of the tank, moisture condenses on the metal jacket and drips downward. Gas water heaters are especially prone to this during initial burner activation, as water vapor is a natural byproduct of gas combustion.
To confirm whether you are facing normal condensation or an active plumbing issue, perform the dry-towel test:
- Thoroughly dry the outer jacket, all pipe connections, and the surrounding floor.
- Place fresh paper towels or dry cardboard directly underneath the unit.
- Leave the cold-water supply open (with the power kept off) for 30 to 60 minutes.
- Inspect the paper towels. If moisture appears uniformly across the metal without a distinct dripping path, you are likely dealing with humidity and condensation. If you see concentrated, localized pooling, you have an active mechanical leak. For further manufacturer guidance, consult What to Do If It Leaks to verify specific unit behavior.
Inspecting Top Connections, Valves, and Tank Seams
If moisture continues to accumulate, begin a methodical top-to-bottom inspection. Water naturally obeys gravity, meaning a tiny leak originating at the top of the tank will run down hidden channels beneath the outer insulation jacket and pool on the floor, creating the false illusion that the bottom of the tank has failed.
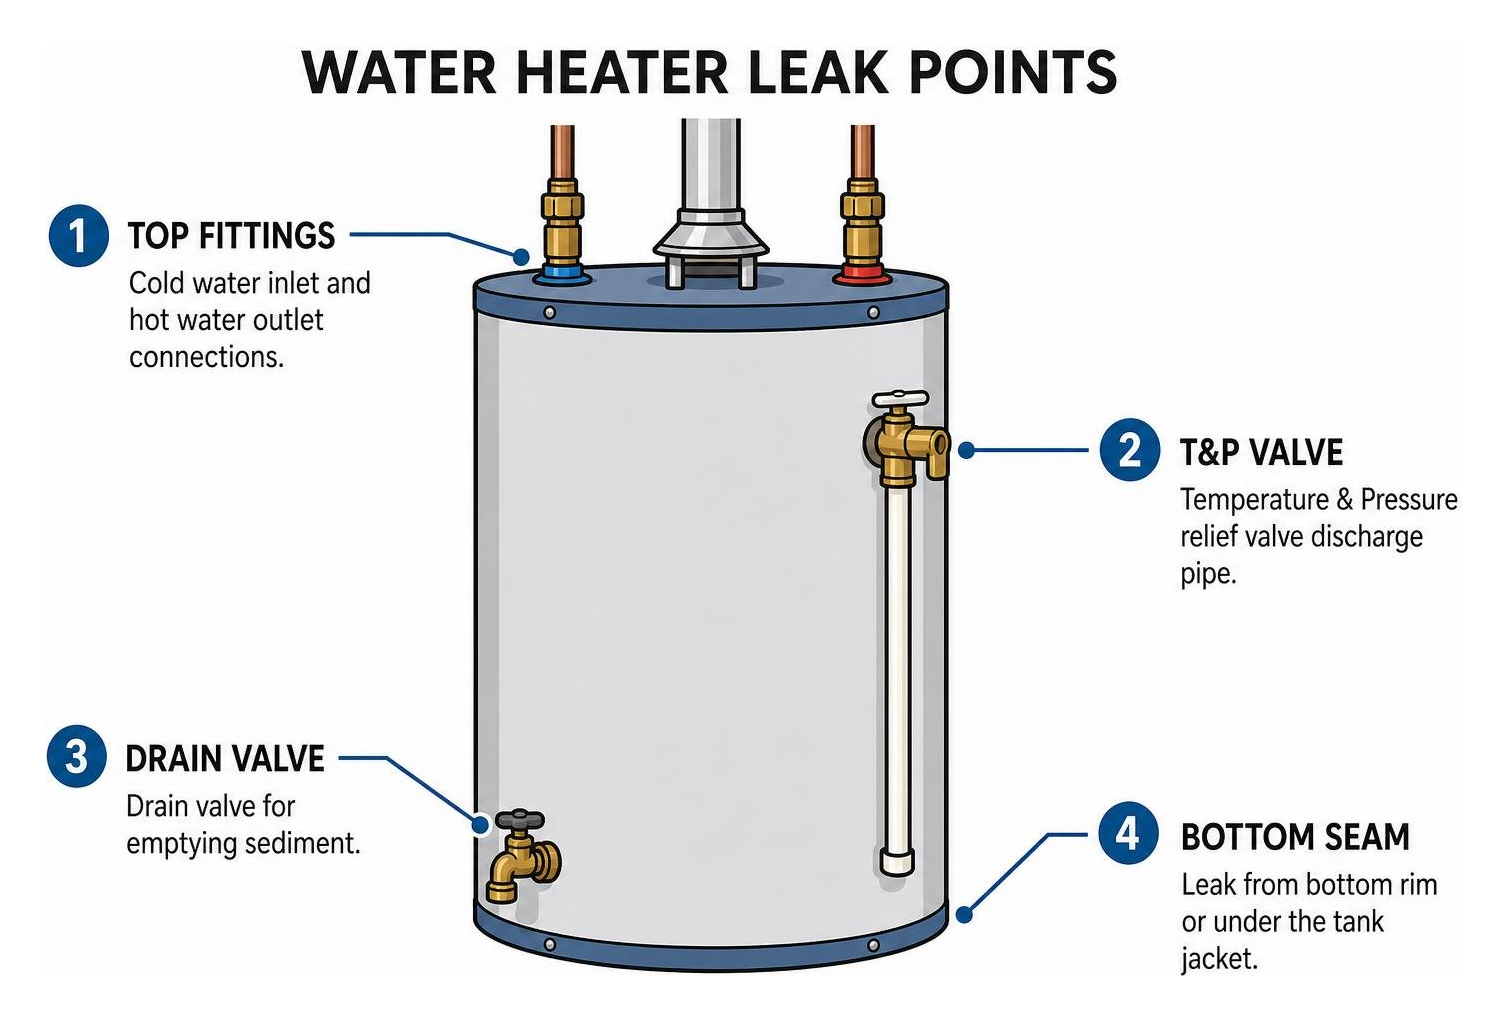
- Top Plumbing Connections: Examine the cold water inlet and hot water outlet fittings. Look closely at the dielectric unions, threaded pipe nipples, and flexible stainless steel connectors. Mineral crusting or green corrosion (verdigris on copper) around these joints indicates a failing seal. Familiarizing yourself with common water heater problems and how to solve them makes identifying these upper connection issues straightforward.
- Temperature & Pressure Relief (T&P) Valve: Located either on the top or upper side of the tank, this safety device features a small brass lever connected to an open discharge pipe running toward the floor. If water is dripping or rushing from this discharge pipe, the valve is either mechanically failing or releasing excessive heat or pressure from inside the vessel.
- Drain Valve: Situated near the base of the tank, this brass or plastic hose-bib fitting is used to empty sediment. Inspect the threading and the stem nut for slow, persistent drips.
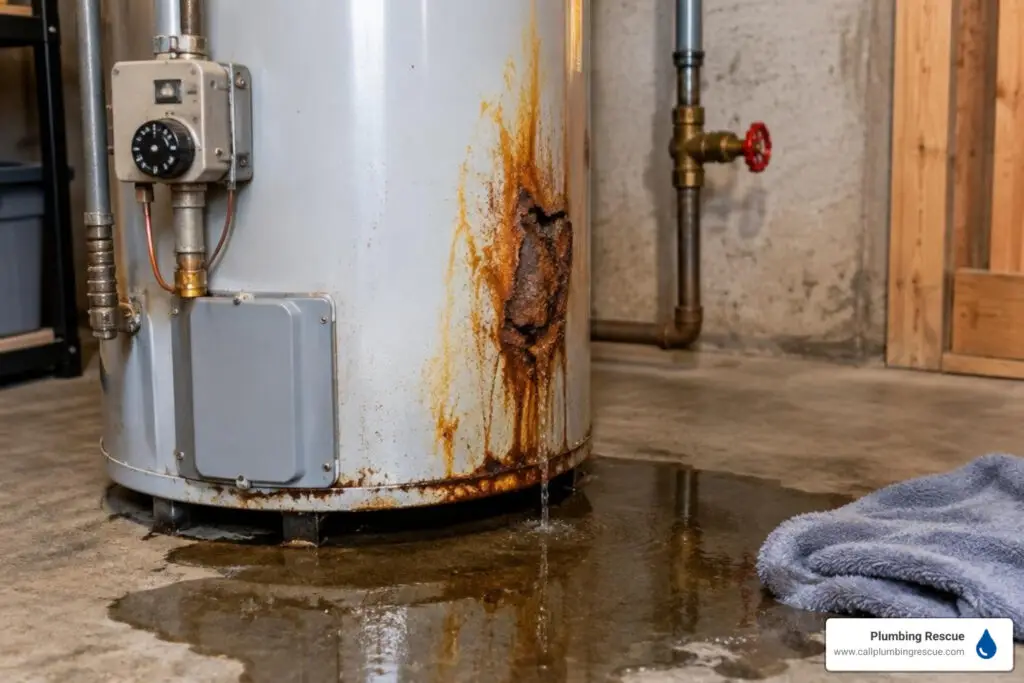
- Bottom Seams and Outer Jacket: If the top connections, T&P valve, and drain valve are bone-dry, but water steadily emerges from the bottom rim or underneath the tank jacket, the internal glass-lined steel reservoir has likely cracked or rusted through.
Step-by-Step DIY Fixes for Common Water Heater Issues
If your diagnostic inspection revealed that the leak is coming from an external fitting rather than the tank itself, you can easily resolve the issue with standard homeowner tools.
Fix 1: Tightening or Resealing Loose Top Connections
Loose threaded fittings at the top inlet and outlet pipes are among the most common, easily repairable sources of moisture.
- Turn off the water supply and shut off the electrical breaker or gas control.
- Open a hot water faucet inside the house to relieve residual plumbing line pressure.
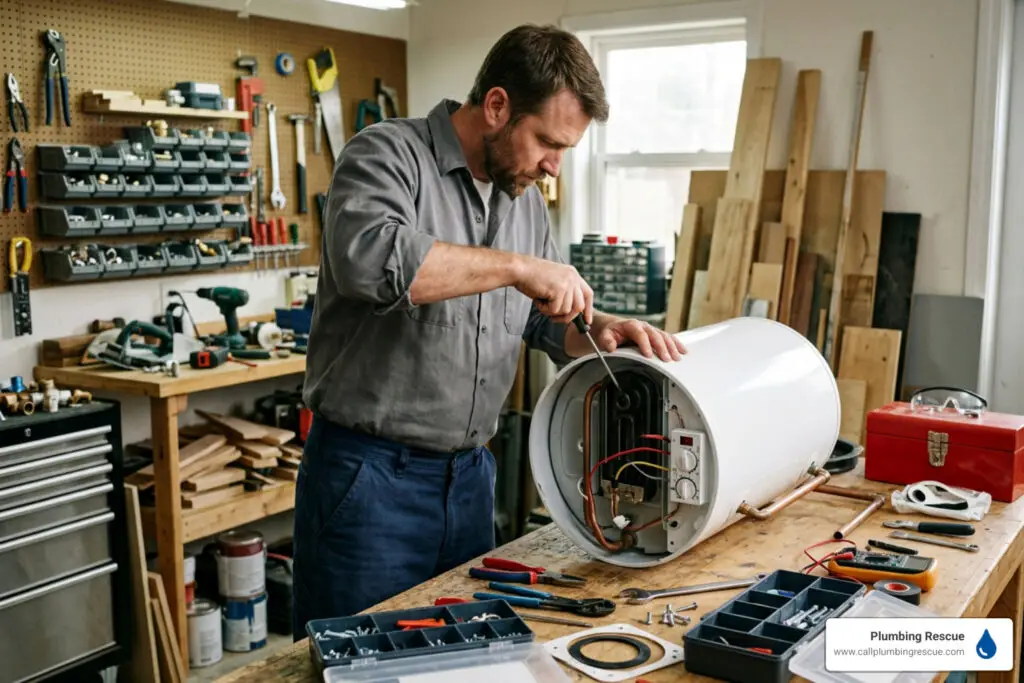
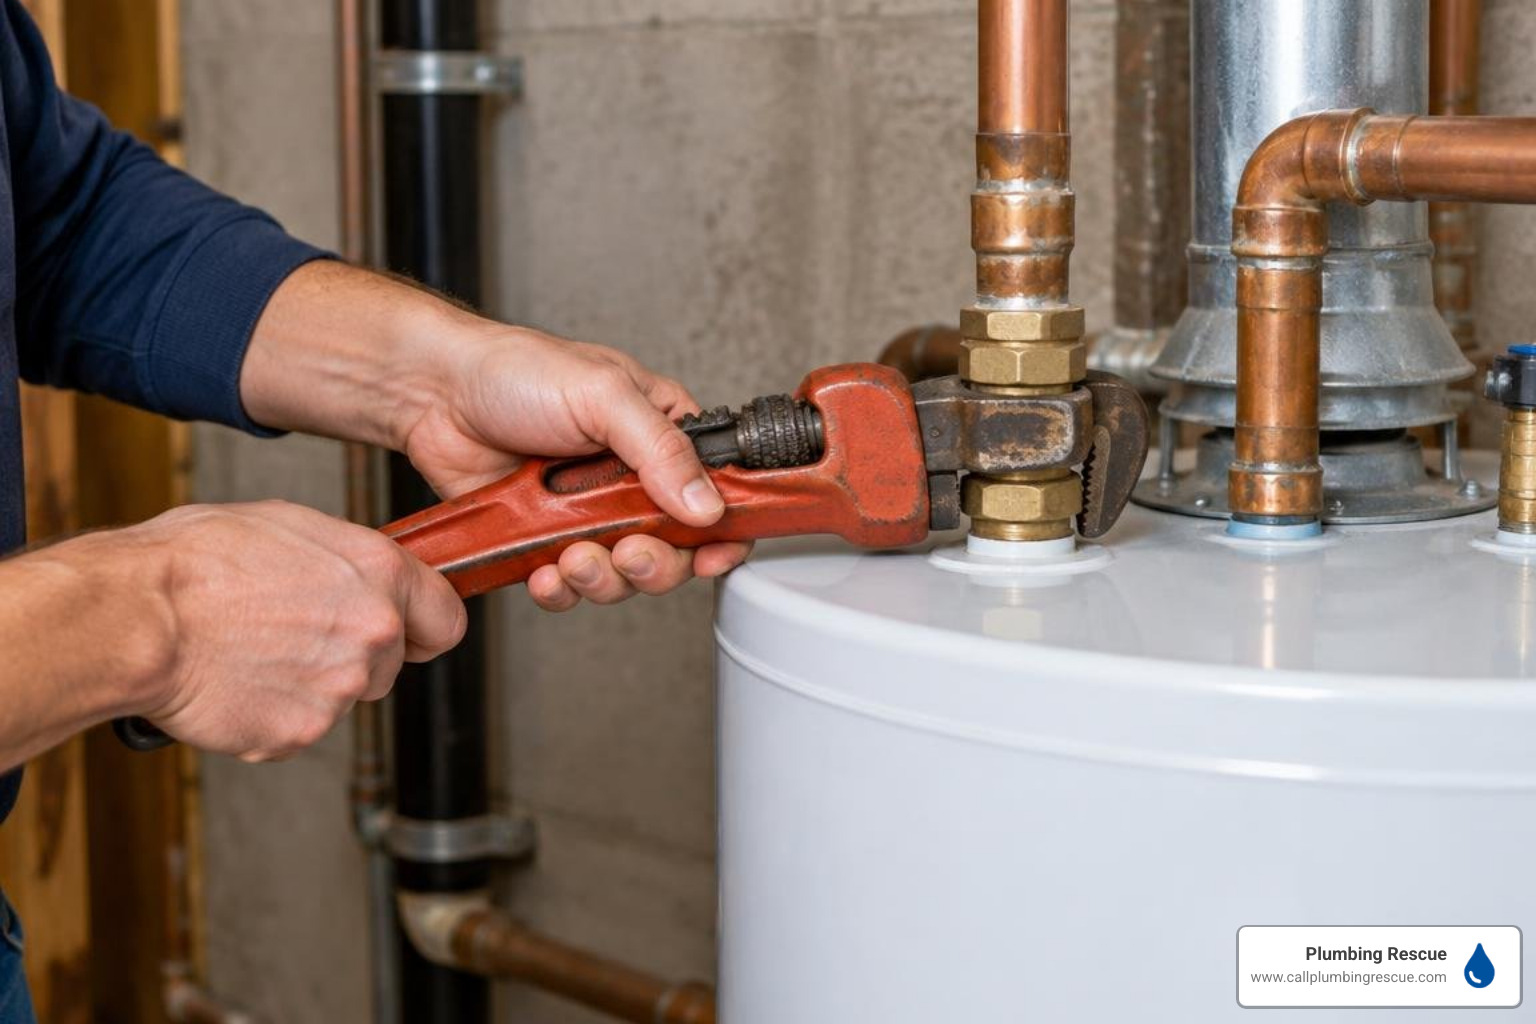
- Use two pipe wrenches—one to stabilize the tank nipple and the other to turn the union or flex line fitting. Gently tighten the connection clockwise. Be cautious not to overtighten, which can crack brass or copper fittings.
- If tightening does not stop the drip, disconnect the fitting completely, scrape away old pipe dope, wrap the male threads with 4 to 5 wraps of Teflon tape (or apply a quality pipe thread compound), rethread the joint, and snug it down firmly.
Fix 2: Repairing or Replacing a Dripping Drain Valve
Plastic drain valves installed by manufacturers often become brittle, while brass valves can suffer from worn internal rubber washers.
- Connect a standard garden hose to the drain valve and run the opposite end to a floor drain, sump pit, or outside.
- Shut off the cold water supply and flip the power/gas off.
- Open the drain valve and let the tank empty completely. (Open the pressure relief valve lever or a hot water faucet upstairs to prevent a vacuum).
- If the leak comes from the valve opening: Screw a brass garden hose cap with a fresh rubber washer directly onto the external threads. This simple fix seals the drip without removing the valve.
- If the leak comes from the threads where the valve enters the tank: Use an adjustable wrench to unscrew the old valve counter-clockwise. Clean the tank port threads, wrap a heavy-duty brass ball valve with plumber’s tape, screw it into the tank until tight, and close the valve before refilling. For step-by-step guidance on component servicing, check out the easy fix hot water heater manual.
Fix 3: Addressing a Leaking T&P Relief Valve
A weeping Temperature and Pressure relief valve should never be plugged or capped—it is your tank’s ultimate safeguard against dangerous over-pressurization.
- Flush Debris: Place a bucket under the discharge pipe. Lift the test lever briefly for 2 to 3 seconds to flush out mineral scale, then snap it shut. If the seat clears, the dripping may stop.
- Replace the Valve: If dripping persists, drain the tank down past the valve level. Unscrew the discharge pipe, then remove the faulty T&P valve using an adjustable wrench. Thread a new, appropriately rated T&P valve (typically 150 PSI / 210°F) wrapped in Teflon tape into the tank port, reattach the discharge pipe (ensuring it terminates within 6 inches of the floor), refill the tank, and check for leaks.
- Address Thermal Expansion: If a brand-new valve continues discharging water, your home likely has excessive municipal water pressure or lacks a thermal expansion tank. Installing a pressure-reducing valve (PRV) set between 50 to 60 PSI, alongside a thermal expansion tank, absorbs expanding water volume and prevents repetitive valve discharge. For an in-depth breakdown of pressure-related plumbing failures, read Why Is My Water Heater Leaking? Common Causes and Troubleshooting – Water System Wiki.
Repair vs. Replacement: When the Tank Bottom Fails
Not every leak can be cured with Teflon tape and a wrench. Understanding when a water heater has reached the end of its serviceable life saves you from wasting money on temporary patches that are doomed to fail.
Why Bottom Seam Leaks Mean Tank Replacement
Residential tank water heaters are constructed from steel lined with a micro-thin layer of porcelain enamel (glass). Over years of heating cycles, hard water minerals, and expanding metal, this glass lining develops microscopic fractures. Once water reaches the bare steel beneath, rust eats through the metal until it breaches the bottom seam.
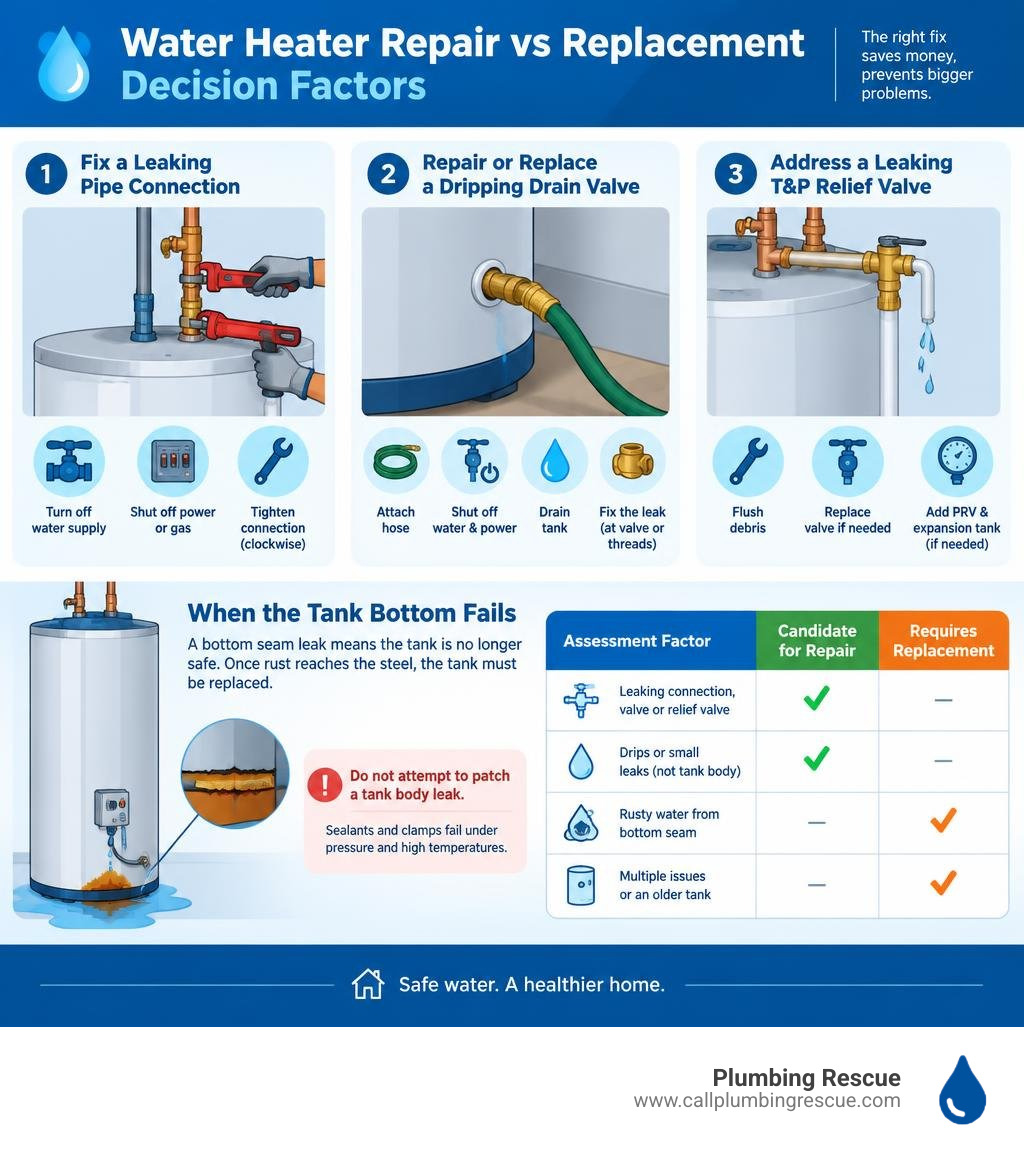
Attempting to patch a leaking tank body with epoxy, silicone, or external clamps is ineffective. The interior of a water heater operates under 50 to 80 PSI of constant pressure while cycling between extreme temperatures. Any surface sealant applied to the exterior will fail quickly, frequently resulting in a catastrophic tank rupture.
When rust water emerges from the base of the tank, you must plan for an immediate water heater replacement.
| Assessment Factor | Candidate for Repair | Requires Complete Replacement |
|---|---|---|
| Leak Location | Top inlet/outlet fittings, T&P valve, drain valve | Bottom seam, lower tank jacket, rusted tank body |
| Water Clarity | Clear water dripping from visible joints | Rust-colored, brown water pooling at the base |
| Unit Age | Under 6 to 8 years old | 8 to 12+ years old |
| Tank Condition | Clean exterior, intact sacrificial anode | Heavy corrosion, bulging outer jacket, flaking rust |
| Cost Ratio | Repair cost is under 30% of replacement value | Repair attempts exceed 50% of a new system cost |
Safety Risks of Ignoring Water Heater Leaks
Leaving a small puddle unchecked in your utility room can spark severe hazards across your home:
- Structural Decay and Mold Growth: Persistent moisture rots subflooring and provides an ideal breeding ground for toxic black mold within 48 hours.
- Electrical Shocks and Fires: On electric models, water tracking behind upper or lower access covers can short-out high-voltage 240V thermostat terminals, sparking electrical fires or shocking anyone touching the tank.
- Gas Leaks and Burner Corrosion: On gas models, water dripping onto the burner tray corrodes the thermocouple and pilot assembly, creating improper fuel combustion and carbon monoxide risks. Always follow established gas water heater gas leak safety steps if you detect the smell of rotten eggs near your appliance.
- Scalding and Flooding: A complete tank seam failure can dump dozens of gallons of boiling water across your floor in minutes, leading to collapsed ceilings if the unit is located in an attic or upper level.
Long-Term Maintenance to Prevent Future Leaks
Preventative maintenance is the difference between a water heater failing prematurely at year six and one running smoothly past year twelve. Dedicating one hour per year to maintenance protects your home against unexpected water emergencies.
- Annual Tank Flushing: Dissolved minerals settle at the bottom of the tank to form a thick layer of sediment. In gas heaters, this sediment traps heat at the base, overheating the steel and fracturing the glass lining. Hook up a garden hose to the drain valve once a year, open the valve, and flush the sediment out until the discharge water runs crystal clear.
- Anode Rod Inspection and Replacement: Inside your tank hangs a sacrificial anode rod made of magnesium or aluminum. Its sole job is to attract corrosive elements in the water, sacrificing itself so the steel tank does not rust. Check the anode rod every 3 to 5 years; if more than 50% of the core wire is exposed, install a replacement rod immediately. Following best practices on how to maintain your AO Smith water heater for years will dramatically extend your tank’s service life.
- Regulate Home Water Pressure: Install a simple pressure gauge on an outdoor hose bib or laundry faucet. If your municipal pressure exceeds 75 to 80 PSI, have a pressure-reducing valve (PRV) installed to protect your plumbing system from stress-induced leaks.
- Install Smart Leak Detectors: Place battery-powered or Wi-Fi-enabled flood sensors on the floor directly beside the heater pan. These devices alert your smartphone the second moisture is detected, allowing you to shut off water before damage spreads.
Frequently Asked Questions About Water Heater Leaking
Can I still use hot water or shower if my water heater is leaking?
If the leak is originating from the tank body itself, you should not continue running hot water. Using hot water draws more cold water into the tank, maintaining internal pressure and accelerating the leak. If the leak is isolated to a minor drip at the drain valve hose threads, you can technically take a quick shower, but you should still shut the unit down and execute a permanent repair immediately afterward to avoid electrical shock or sudden rupture.
How long will a water heater last once it starts leaking from the bottom?
Once a water heater leaks from the bottom seam or lower tank body, its functional lifespan is zero days. There are no reliable adhesives or structural weld techniques capable of restoring a cracked, glass-lined pressurized vessel. A tank that is weeping from the base can hold together for a few days or blow open within hours; arrange for a replacement unit without delay.
What is the most common cause of a leaking water heater?
The most common cause of repairable leaks is a loose plumbing connection at the cold/hot water flex lines or a failing rubber gasket on the drain valve. The most common cause of unrepairable leaks is internal corrosion resulting from an expired sacrificial anode rod, which allows sediment and hard water minerals to rust through the steel tank walls.
Conclusion
Managing a leaking water heater requires a clear head, rapid safety actions, and an honest assessment of whether the problem is an easy DIY fix or a sign of total tank failure. By quickly shutting down power and water supplies, drying the area, and inspecting the top fittings, valves, and bottom seams, you can resolve minor valve issues yourself and protect your home from extensive water damage.
When the tank body rusts through or you are dealing with complex gas lines and high-voltage wiring, calling in licensed professionals is the safest route forward. Our team at Plumbing Rescue is dedicated to rapid call routing, connecting you with local plumbing providers in Austin, TX, Denver, CO, Indianapolis, IN, and Phoenix, AZ. Whether you require middle-of-the-night diagnostics or same-day tank installations, contact us for 24/7 emergency water heater repair and restore your home’s hot water safely today.
Dealing With This Yourself? Talk to a Licensed Plumber.
Skip the guesswork — get a straight answer from a local pro. Available 24/7, no forms, no waiting.
Call Now: (888) 686-0698